January 10th, 2012
Last year, while surfing through my favorite art supply store I came across some tiny canvases and thought…oooooh fun! They are super fun to buy but a ton of work for such a tiny painting. I started a series that has had a great response… my ‘Tiny Treasures’ series. 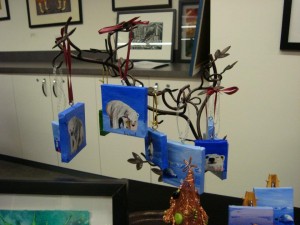 I started selling them for the Christmas/Holiday season and realized that people wanted more… so this year I did some more. This year I did a polar bear series, and expanded the repitoire to include 3×3 inches not just 2×2 inch paintings.
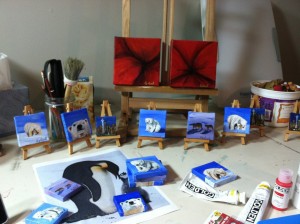 I did several Seattle scenes (those sold on the first day of display) and a bunch of Polar Bears, as well as the snowmen I created last year. I intend to create more and to offer them throughout the year. I think I’ll create a bunch of Seattle scenes as well as some scenes for other areas. Given that I come from the DC area I think I might make a few tiny treasures for the DC Area (monuments etc) and maybe some of the San Francisco bay area. I’d love to hear comments about ideas or things you think you’d like to see!
Posted in News | No Comments »
November 8th, 2011
I have a new show up at the Women’s Wellness Center in Everett, WA, http://www.womenswellnesscenter.org/. The Women’s Wellness Center is a wondeful place in Everett, WA The Women’s Wellness Center is a unique facility that combines wellness coaching, circuit strength training, body treatments, spa services, and healthy lifestyle classes. An overall approach to personal wellness designed for women and girls..
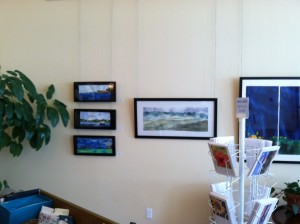

This show is a fun combination of existing pieces and some new locally inspired pieces. The show is a on display in their foyer and in their exercise class area, hopefully inspiring some good sweaty workouts! I’m so pleased to be a part of this.
Posted in News | No Comments »
October 22nd, 2011
So… you’re reading the blog of the new board member for the Shack Art Center (http://www.schack.org/). I’m incredibly honored and super excited to contribute to such a fabulous place. I know I bring a unique perspective as an artist who also has started some businesses and worked with foundations and I know that I have a ton to learn from them.
For those of you who are unaware of the Shack, you should be! It’s this incredible non-profit organization that brings artwork to the community in Everett and Snohomish county. It has a hot-shop for glass, classrooms for instruction in a variety of art techniques, from painting to collage to kids classes. All classes are taught by local artists and are open to everyone! This is the same group of people who started the ‘Art in Great Spaces’ Program that brought so much additional art and life to the community in Everett.
I can’t wait to contribute and see you there!
Liz
Posted in News | No Comments »
October 13th, 2011
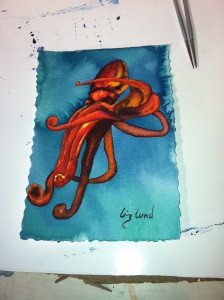
So while painting the mural for my son I fell in love with the Pacific Northwest Octopus. I loved the colors, the oddity and the sheer fun of painting an octopus… so I decided to paint one in watercolors instead of on a wall in acrylic. 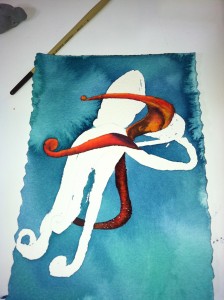
When painting in the puddling style one should plan out the basic shapes and think through the order of your painting. With this painting I used masking fluid to preserve the shape of the octopus while keeping the background looking like it flows together and has an interesting composition. The task then was to pick the order of the legs to paint…so fun!
I opted not to have each leg have suckers…. While it’s certainly possible to use masking fluid and go as detailed as you’d like with the painting I frankly just get bored with that level of detail…
Posted in News | 1 Comment »
October 12th, 2011
There is a call for art out there for three 12 x 12 paintings and I’ve been planning on creating a series based on ‘Blackbird’ by the Beatles.
The idea came to me while I rocked my baby to sleep and heard ‘Blackbird’ playing behind me. The lyrics are as follows:
Blackbird singing in the dead of night
Take these broken wings and learn to fly
All your life
You were only waiting for this moment to arise
Black bird singing in the dead of night
Take these sunken eyes and learn to see
all your life
you were only waiting for this moment to be free
Blackbird fly, Blackbird fly
Into the light of the dark black night.
Blackbird fly, Blackbird fly
Into the light of the dark black night.
Blackbird singing in the dead of night
Take these broken wings and learn to fly
All your life
You were only waiting for this moment to arise,
You were only waiting for this moment to arise,
You were only waiting for this moment to arise
Here’s my vision:
Three images with text behind them. Blackbirds will be featured in all of them. The colors will be of the night and tiny splashes of color from the blackbird will be on display.
Posted in News | No Comments »
August 24th, 2011
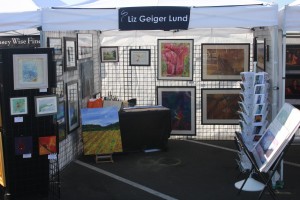
Several months ago some friends of mine convinced me that not only could I apply for and be accepted to Fresh Paint in Everett but that I could do a good job at the festival. It’s a juried festival and every year it apparently gets harder and harder to get into, so when I was accepted I was honored, excited and very very nervous. The people that I know who have done the festival are uber professionals and really together with their tents, displays and products for sale. Whereas this was my first real festival and I had a lot to learn about all of that.
I know I can sell things but I’ve always had to work hard at displays and marketing. I find myself much more comfortable marketing other artists than marketing myself. I am tempted to say “I rock, my artwork is solid.. buy some” and call it good… but alas that just doesn’t work in the professional world. Add in the fact that I had a two month old baby when this festival was scheduled to happen added a little bit of stress. Oh and we traveled for a memorial service one week on the east coast the week before the festival. Total it all up I felt as if I was in way over my head.
Here’s the thing though, the artist community in the Pacific Northwest is incredible. People are generous with their time, support and supplies. I’m continually amazed that people have done so much to support me. My friend Janet loaned me her fabulous tent and grids, another friend loaned her grids to me. And then my rockstar in-laws came in and helped me with everything. On top of it all, my husband just did more than I can express to help pull this off. I caught a cold on the trip and proceeded to completely go down and my husband picked up the tent, grids and display things for me.
Then the day of the event rolled in, I was so nervous that I was shaking, I was ready way in advance of the set up time, and barely slept the night before. The day was sunny with not a cloud in the sky and gorgeous. It was all I hoped for; within two hours of things starting I sold two original pieces. People were lovely and supportive of me and my artwork. I can’t express how fun it is to see someone do a double take while looking at my booth or walk away from a demonstration saying, “Wow, that was cool”. Although I wasn’t able to continue sales at my starting rate I have to declare the festival a success. I enjoyed the experience, learned a ton and had the honor of being near several talented artists.
Posted in News | No Comments »
May 31st, 2011
Creatures:
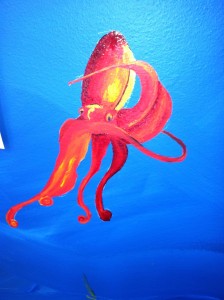
This was an intimidating prospect for me as I generally paint landscapes and not creatures. It required a lot of pre-sketching and general research. On a tree I can move a limb and no one knows… you can’t exactly move a fin on a whale and not notice the difference. For each creature I looked at approximately 5-6 different images, practiced sketching them and then just went for it. I have found that once I say that the image doesn’t have to be
perfect I can enjoy the process of creating each creature. If I say it has to be perfect I stress out and don’t enjoy the process of painting a creature.
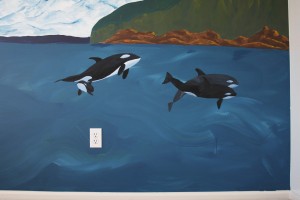
I opted to paint fewer creatures than originally planned because I ran out of steam, but also because it was getting increasingly difficult to squat/sit for hours in front of the wall. I chose to paint a belugah, a pacific northwest octopus, some cool jellyfish and a small pod of orcas.
Lessons Learned: This is definitely the time to bust out the acrylic paint and the good paintbrushes. It will be much much easier to paint these critters if you have the control and color selection offered by professional acrylics.
Completion:
At the end of the day my plan was to create a mural that I enjoyed, that my son would hopefully enjoy and I believe I have a success. This mural was a much larger project than I initially understood, however, I’m proud of the results. Maybe after I give birth I’ll add in some ocean floor and ocean floor creatures. But that part of the project will have to wait until I can bend over and paint near baseboards.
Posted in News | No Comments »
May 5th, 2011
Landmasses:
This is where I opted to use house paint instead of acrylic paint. I definitely saved money but it was way harder to use house paint here. I believe that acrylic paint would have made it more luminous and I wouldn’t have had to recover the drips from the blue ocean. But I made it work anyways. I went for a stylized landmass that referenced the San Juan Islands (one of my favorite parts of this world).
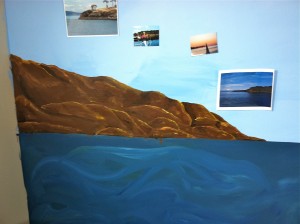
Lessons Learned: 1) If you can afford it use acrylic paint… it’s way way easier! You won’t have the drips I did off the landmass area. 2) I wouldn’t use expensive brushes because the house paint will trash the brushes but the professional brushes definitely made a difference in the ease of painting my landmasses. That being said I found some fabulous brushes at Daniel Smith on sale that were fabulous. They were cheap but similar to brushes designed for use by a professional artist.
Note: on this image you can see the white chalk outlines of what else I was going to add. This was my secondary sketch of the mountain area. I used white charcoal because it wiped off with a damp cloth!
Mountains:
When I planned this I decided to have a line of mountains that would make the viewer either think of the Olymipic Mountains or the Cascade Mountains. I had a great time painting these mountains and definitely went overboard. When I was done I realized that I created a field of mountains more reminiscent of a Glacial field than a mountain range… whoops!
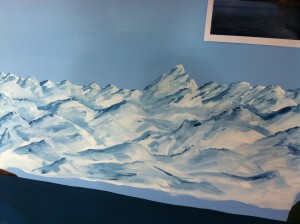
Posted in News | No Comments »
April 28th, 2011
The basic elements to my mural were going to be the ocean and the sky. These had to define the space, the horizon line and needed to be visually interesting in it’s own right.
The first question was, where do I put the horizon line? I treated this piece as a huge piece of artwork so I needed to be conscious of the horizon line and visual flow, but still have fun. I didn’t want to split the wall evenly but I did have a long list of creatures I wanted to paint in the ocean. I opted for slightly lower than halfway. I believed that this would be more visually interesting and still leave enough room for sea creatures. It turns out I had more than enough room for the creatures but that’s because I couldn’t bend over enough with the preggo belly to paint the ocean floor.
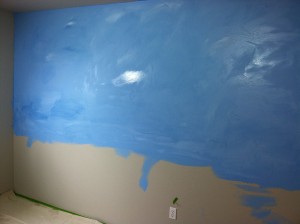
When contemplating how to paint the ocean using house paint, I opted to go for a raw sort of look. I wanted variety in the colors but I also thought that it was critical to create a feel of movement in the ocean. The ocean is never still, it’s always moving and it breathes. I opted to go with the raw unmixed and unblended colors and just swoosh them all together. I’ve had great luck with how paint will blend on it’s own and if it’s all wet paint you can create a very active but interesting visual. In the ocean you can definitely see specific brush strokes (sorry Art Professors in college, you can tell what size brush I used!). I believe that this creates a lot of movement and action in the ocean. To create variety in the colors I used three colors of blue for the ocean and one foresty green color and didn’t mix them up. This means that there are swaths of different colors swooping throughout the ocean. I opted to go with the raw unmixed and unblended colors and just swoosh them all together. I’ve had great luck with how paint will blend on it’s own and if it’s all wet paint you can create a very active but interesting visual.
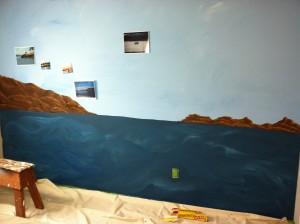
For both of these sections I used a large 4in brush and painted rapidly. In the ocean area you can see how my raw blending of colors in the paint tray made for a visible brush stroke and lots of good movement.
Lessons Learned: For these sections I’d recommend painting the areas quickly and in vertical swathes. I wanted horizontal movement of the ocean but the reality is that the house paint dries just fast enough that you need to paint the horizontal movement in vertical stripes. Otherwise it just won’t look right. Also, be careful what order you paint in. I’d recommend painting the sky first and the ocean second… otherwise potential drippage can cause angst and do-overs.
I did something similar but simpler for the sky. I just added in a little bit of white to the sky blue.. ok and a tiny bit of darker blue. It turns out that it looks like wispy clouds in the daytime sky. There is no need to mix it together just dump a bit of white into the color and roll with it. I didn’t feel the need to have such an active visual for the sky and wanted to keep it simpler.
Posted in New Projects | 2 Comments »
April 23rd, 2011
When I was a child I had a mural on my bedroom wall painted by my mother. It was amazing, and every night I was able to say goodnight to the purple elephant (who ironically had a nice round preggo belly-mum was 9 months pregnant when she painted the mural) and pet the butterfly and caterpillar goodnight. When I adjusted to the idea that we would be bringing a child into this world I thought… I want a mural for my child too! Looking back I was totally insane, this is a fun but massive project. Throughout this series of blogs I’ll be highlighting the lessons I learned so you don’t have to re-learn the lessons!
I didn’t really understand what the project entailed when I decided to paint the mural and typical of my history I bit off a huge chunk when creating the project. I decided to paint a wall about 10×12 with a mural based on the Pacific Northwest. And unlike reasonable people I went for a quasi-realistic scene. I don’t know how to create cutesy animals and scenes. When I do try to create them they look ridiculous and unappealing… so I didn’t even try for this project.
The process started with planning, and sketching and then some more planning. I opted to sketch on the wall as I considered composition. This gave me a good perspective of where I wanted the horizon line. Of course as a trained artist I couldn’t put the horizon line in the middle but neither did I want the whole piece to be all sky… I needed some room to paint the ocean creatures.
Lessons learned: I definitely would recommend using a charcoal pencil to do this. Graphite pencil or red colored pencil would leach through the paint and then everyone would know about your pre-painting sketching. I also recommend using either a black or a white charcoal pencil, red is a wonderful color but frankly it is more likely to bleed through than the white or black.
When I asked my guru art friends about murals they all suggested using professional grade Acrylic paint to paint the details on the mural. But that much acrylic paint just wasn’t in my budget. I used house paint to create the landscape and saved the acrylic paint to paint the creatures. Now that I’ve completed the project I’d recommend using as much acrylic paint as you can afford. It’s designed to handle layers on a vertical surface, won’t drip and the colors are sooo much better. I definitely had to re-do areas where my landmass dripped into my ocean, and if I’d used acrylic I wouldn’t have had to redo a thing! All that being said, house paint worked ok… just remember that house paint dries slightly darker than it’s wet color!
Posted in New Projects, News | No Comments »
 I started selling them for the Christmas/Holiday season and realized that people wanted more… so this year I did some more. This year I did a polar bear series, and expanded the repitoire to include 3×3 inches not just 2×2 inch paintings.
 I did several Seattle scenes (those sold on the first day of display) and a bunch of Polar Bears, as well as the snowmen I created last year. I intend to create more and to offer them throughout the year. I think I’ll create a bunch of Seattle scenes as well as some scenes for other areas. Given that I come from the DC area I think I might make a few tiny treasures for the DC Area (monuments etc) and maybe some of the San Francisco bay area. I’d love to hear comments about ideas or things you think you’d like to see!


